Real photography mostly isn’t about the equipment you are using when you have at least a certain level of camera you are using. There are some tools though, which will improve the possibilities you have and just make life a little bit easier.
Capturing a specific theme in photography is probably a little bit like a toolbox where the camera is the central part and where different tools can help you to achieve different things. A portrait photographer for example needs other equipment than somebody who want’s to capture the skyline of Chicago and where a flash usually doesn’t make too much sense at all. So here are my favorite 5 tools I am using for my landscape and cityscape photography I really don’t want to miss anymore.
1. L-Bracket
This is probably the most underrated tool and therefor my favorite helper for photographers, because it solves multiple issues at once for very little money. The so called L-Bracket is a part of metal that is fixed at the bottom and at one side of the camera. It has a rail, which is usually compatible to the Arca Swiss standard, used for most of the better tripods.
This tool gives you the opportunity to attach the camera on 2 sides to your tripod to shoot in vertical and in landscape orientation. It’s not just that you can switch between the two positions very fast, but it’s also about the benefit that the center of gravity also stays in the middle of the camera like it does when you are shooting in landscape orientation. If you are not using an L-Bracket you usually have to put your ball head into the slot on the side, which changes the balance of your tripod. Sometimes you can even see your camera moving very slightly towards the floor, especially when you are using some heavier lenses. This happens because of the tripod panel beyond your camera and no matter how tight you are fixing this part to your camera, there is still some point where the camera is at least moving very slightly, resulting in unsharp photos during longer exposures.
When I bought my Sony A7II last year I immediately ordered this compatible L-Bracket for just around 20 Euros. Just make sure that it’s exactly fitting, because all of them are slightly different based on the form of your camera body.

The L-Bracket (surrounded by the white border) is fixed at the bottom of the camera, making it possible to use your camera in portrait orientation without changing the position of your ball head.
2. Filters
ND-filters are quite popular these days because of their very special effect and the opportunities they offer to change the style of your photos. But there is still another type of filters I would recommend every photographer. I am talking about polarizing filters, which can improve the contrast in the sky with the clouds, but more importantly remove reflections from water or reflecting surfaces in general. While some of the effects of ND-filters can be achieved without them by changing the daytime or even partly in post processing, you can’t just remove all the reflections of a bigger surface afterwards. A good example for the effect are rivers, where you can still see the stones on the ground to get even more details within your images. You can even combine both types of filters to get longer exposures and get rid of the reflections in your scene.

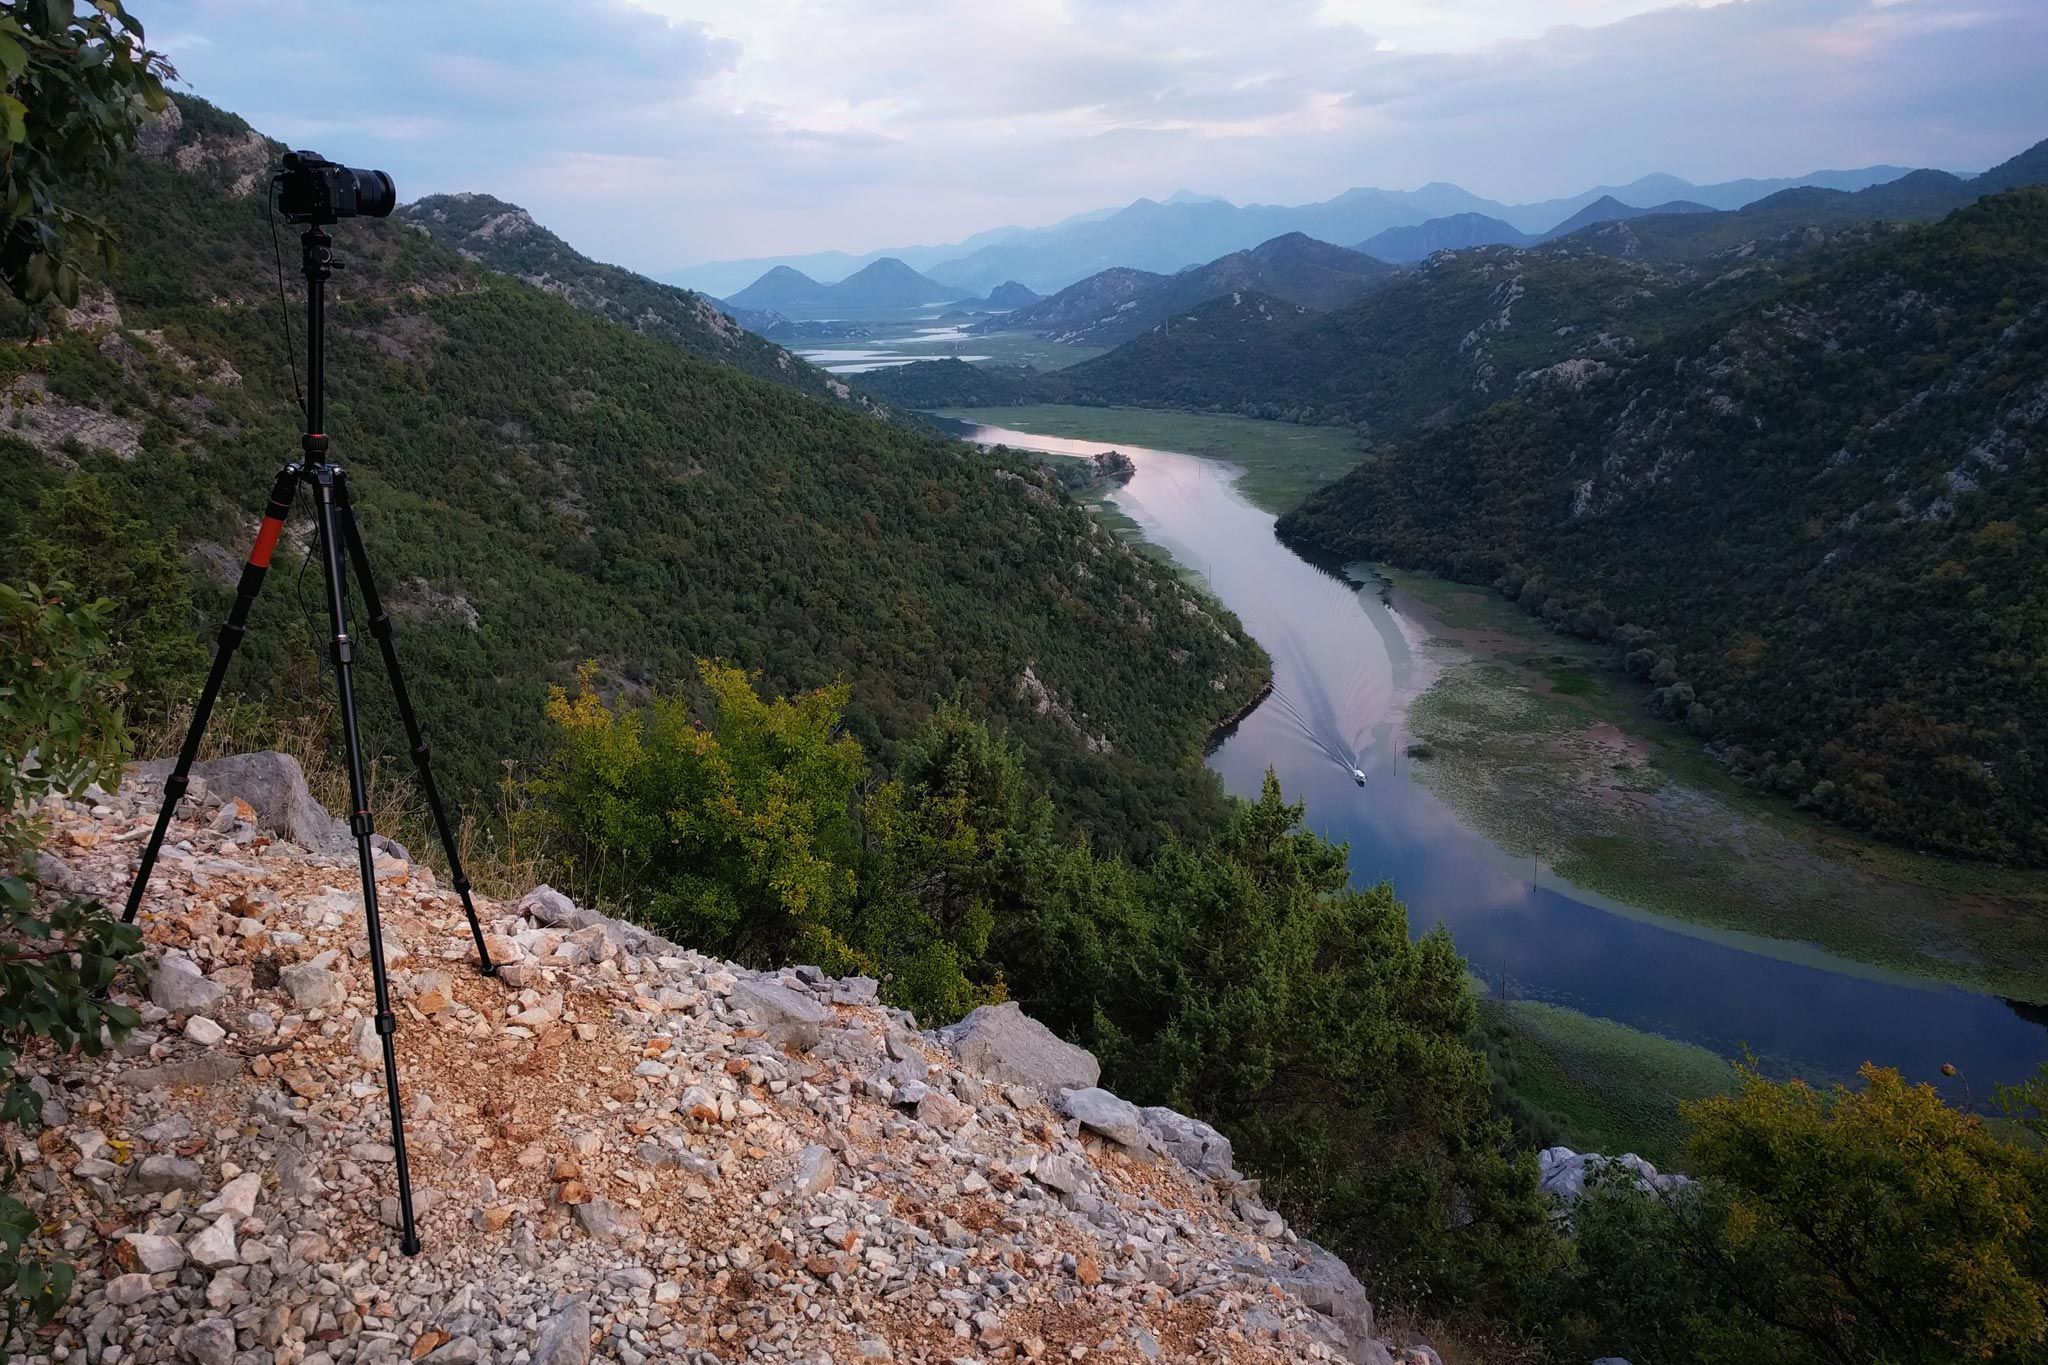
This is the final result from the spot in Montenegro where I was standing in the header image of this article. ND-Filters helped me to get the very smooth sky.
3. Remote Control with timer
I still see a lot of photographers using a tripod without a remote control, limiting theirselves in getting much better and especially sharper photos. If you are not using one yet this is definitely a must-have for landscape photography, because pressing the shutter at your camera means that you are moving it for a little bit. Setting the timer to 2 seconds kind of solves the initial issue, but you still can’t expose images for more than 30 seconds in bulb mode without using a remote control.
Like I already said there is in my opinion no sense to pass on this usually very cheap tool, but that’s not what this recommendation is about. Most of the very cheap remotes don’t have a display with a timer and most of the cameras aren’t showing you the exposure time in a good readable way either, which makes it pretty hard to get exact timings. They are particularly important when you are for example shooting panoramas and when you wan’t to make sure that all of them are nearly at the same brightness. The same applies to photographing star trails with identical exposure times beyond 30 seconds etc.
I always thought that the display on a remote is just another thing I don’t need, especially because it needs additional batteries. They are usually pretty durable though and the remote control is still working without them, but of course without showing you anything on the display. After using this kind of remotes I truly can tell you that you should try it too. The part I love the most about it is that I am more than often are not setting the time on my camera and that I am always just shooting in bulb mode, even when I don’t need exposure times beyond 30 seconds. This makes my photography very flexible and I am touching the camera far less, resulting in images that are perfectly overlapping when I want to merge them together in difficult lighting scenarios.

Two cheap remotes, one with a timer and lots of different settings and one without. From my experience it's also a good idea to always have 2 in your backpack, especially in countries like Iceland where the rain and weather easily can break them.
4. Tripod isn’t tripod
When I just started photography I thought a tripod is a tripod. How different can they be when the only purpose is to hold your camera during longer exposures, so most of the beginners buy the cheapest one they can find and I did so too. Although the initial impulse might not be false, I started to learn it the hard way by the amount of photos that got more or less destroyed by using this sort of bad equipment. I was traveling quite a lot, so I decided to try a Gorillapod afterwards, because they are very light and I loved the possibility to be on my feet all day long in New York for example without having to carry a heavy tripod with me. It solved the weight issue for me, but it didn’t take a long time when I started to realize that this kind of tripod is limiting me so hard in the choice of my perspective. While it is true that you can attach this type of tripod to a lot of different parts within your environment like handrails or grids, I totally forgot about the fact that other people are usually shaking the same parts at least once when doing longer exposures. I guess that’s just something they have to do, to make sure that you won’t get the shot ;-)

I just love this perspective from Brooklyn Bridge in New York, but I had to put so much effort into getting this shot. Especially the right part of the image was pretty blurry and I had to sharpen it a lot with Photoshop, because I had to shot this with very short exposure times while the handrail was shaking. Using a good tripod would have saved me hours of post processing and because of all the sharpening I had to do it's only good as a digital photo, but not for print.
Jokes apart, it’s more than often a bad solution and I regretted my decision. Afterwards I bought two different tripods - one very light one for travel and a more solid one for all the photos I am taking when I am not hiking all day long. When I look back now this didn’t make sense either, because I am always using the solid one now. The reason is, that it’s just so much more comfortable to use it instead of the rickety travel tripod, which isn’t bad at all, but again you limit yourself in so many ways, that I definitely can recommend you to invest a few bucks more to get one good tripod with a ball head (please do yourself a favor and don’t buy one where you can only change the axes with different levers). Just make sure that it’s Arca Swiss compatible, because you really wan’t to use that L-Bracket I already mentioned and that you can trust the fixation, because the worst that can happen is that your expensive camera falls of your cheap tripod.
I am currently using the C-5i II from Rollei, which has an awesome cost-benefit ratio. I am probably switching to the carbon version in the future to save even more weight, but I am really happy with it for the very cheap price. Carbon has some more benefits, but in my opinion you can still get great shots with the aluminium version without passing on opportunities or comfort.

The C-5i II from Rollei offers a great cost-benefit ratio and is therefor from my experience the minimum you should invest into your tripod.
5. Headlamp
As I already explained in the article about the difference between the top landscape photographers and everyone else it’s crucial to be at the right time at the right spot. This usually means that you have to walk to the spot in the darkness when you want to shoot it during sunrise or you are leaving it after sunset when it’s already dark outside. In both situations a headlamp makes life so much easier for you, because you can use both hands to set up and protect your equipment while walking around. Additionally it saves the battery of your smartphone, since you don’t have to use it as a flashlight, which needs quite some energy.
Estimated pricing for minimal equipment
In my opinion there are 2 different bundles I would suggest you when you are just starting with landscape photography. One that is the very basic must-have equipment list I would never make a compromise and an advanced one which adds a lot more possibilities and comfort to your photos.
Must-Have equipment
- Tripod with ball head, Arca Swiss standard ~ 125€
- L-Bracket ~ 20€
- Photography-Backpack ~ 80€
- Remote control without a display ~ 8€
- 2 ND-filters (ND3.0 for bright lighting conditions during the day and ND1.8 for just around sunrise or sunset) ~ 100€
- Adobe Lightroom ~ 12€/month or Skylum Luminar ~ 59€ once
Suggested minimal equipment
- Tripod with ball head, Arca Swiss standard ~ 125€
- L-Bracket ~ 20€
- Photography-Backpack ~ 80€
- Remote control with a display ~ 30€
- 2 ND-filters (ND3.0 for bright lighting conditions during the day and ND1.8 for just around sunrise or sunset) ~ 100€
- 1 polarizing filter ~ 50€
- Headlamp ~ 50€
- Adobe Lightroom + Photoshop ~ 12€/month or Skylum Luminar + Affinity Photo ~ 110€ once (both softwares are available without a monthly subscription)
Please don’t forget, that this is the minimal equipment I would suggest you as a beginner. Of course there is no price limit on higher quality tripods or filter holders that are more comfortable to use and even headlamps can easily cost over 200€. But that’s not how you start and improve your results significantly.
Additional advice
You can’t have enough cloth to clean your camera lens and filters, especially when you are shooting waterfalls or during bad weather conditions. Another thing I am always having in my backpack are some shower caps. You can buy them for very little money or maybe just take them with you after your next stay in a hotel and they are perfect to protect your camera between shots when it’s raining or when there is spray from a waterfall.
Did I miss anything that you love to use? Please let me know in the comments below!


Comments (9)